

How To Repair Outside Wooden Stairs Paint
A fresh coat of paint is 1 of the most inexpensive ways to freshen-up your home's exterior. But whether you program to paint wood, masonry, metal or even plastic, preparing the surface before applying the topcoat is the first critical phase of the project. It may be a dreary procedure, but taking the fourth dimension to correctly prep the chore will pay off in smooth, durable coverage sure to last for years.
Pigment is basically colored glue. Because it is designed to form a movie, its inherent nature is to peel when it tin't adhere to a surface. Paint volition, however, stick well to substrates that don't shift below the pigment. Metal of just virtually whatever type is an fantabulous substrate. Aluminum siding is a adept instance; paint tin can final for years on aluminum. Aluminum fifty-fifty expands and contracts, but the pigment holds on. Wood and other "moving" surfaces that contract or expand due to moisture or temperature change may crave some extra preparatory steps to minimize peeling.
Cleaning and Scraping
First, check the label on the can of paint you lot intend to utilize. It'south a prophylactic bet that somewhere the characterization reads: "Utilize to a make clean, dry out surface." Earlier priming, make sure the exterior surface of your textile is make clean — free of dirt, grease, mold, mildew or any other droppings.
For previously painted surfaces, start by removing any loose, peeling pigment already present. Flat putty knives or "pull" scrapers work well for this. Pull scrapers feature shallow U-shaped cutting blades that help cut through sometime oil paints. Remove as much loose pigment equally possible, and wear goggles when scraping overhead to keep paint fries out of your eyes. Then wash and rinse the surface. Bank check the scraped areas once more where the pigment meets the bare surface. Likely, in that location will still be signs of paint film lifting slightly from the surface. If so, scrape these areas once again.
Some substrates can be sanded shine where the old paint meets the bare surface. For maximum paint adhesion on glossy surfaces, scuff-sand the surface before painting. Only proceed in mind, there are some situations where sanding isn't a practiced thought. Some quondam, exterior house paints contain lead. Sanding this blazon of paint will generate toxic atomic number 82 dust. If you lot don't know the history of the paint yous're removing, you can contact local health officials for information on lead paint testing.
The side by side step is to wash the surface. Regular liquid dish soap may work fine, although it does produce a lot of suds. Y'all may opt for a non-soapy detergent such as trisodium phosphate (TSP) or a TSP substitute to get rid of dirt and grease. Using the soap, rub the entire surface with a sponge or scrub brush to remove all dirt. If mold or mildew is present, use a mildew-removing solution, available at habitation stores like Lowe's and Home Depot. Then quickly rinse with clear water from a standard garden hose to remove the dirty water, and permit the surface dry out thoroughly earlier priming. Allow porous surfaces such as forest or brick to dry for a minimum of two days before continuing.
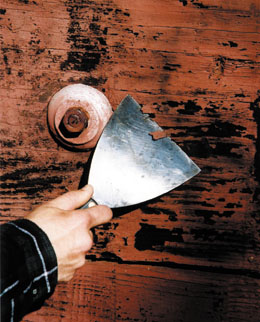
Remove any existing loose paint with a pigment scraper and make clean the subsurface throughly with water and detergent.
Wood Worries
Woods can be the toughest material to pigment. Its tendency to expand and contract tin can take a toll on the strongest pigment. And with paint as wood'southward only line of defense, if exposed edges or seams aren't painted, astringent rot can develop inside but a few years. All wood surfaces must be primed with an exterior wood primer.
Paint will attach quite well to wood if the entire wood slice is primed earlier it'due south installed. That's why many wood sidings are bachelor factory-primed, which is highly recommended for new homes or room additions.
To seal the woods completely requires painting and priming the cut edges, likewise as the face up of the boards, but few carpenters bother to do this. The cut ends are often where end grain is exposed, and this is where it is easiest for h2o to enter the wood. The captivated h2o can migrate five to 6 inches away from the cease of the lath. This is often why you see the edges or bottom portions of trim boards fleck. Do what you can to eliminate this kind of water intrusion.
Try using standard acrylic latex caulks to seal the end grain. Wipe the caulking with a moist sponge as shortly equally information technology is applied to produce a make clean, smoothen articulation. If painting siding, caulk all joints between the siding and trim boards. However, do non caulk the bottom border of clapboard siding. That pocket-sized fissure on clapboard allows the siding to movement and allows vapor to escape.
For wood surfaces, Apply a rust-inhibitive primer to whatever exposed nails. Countersink the nails and make full the holes with exterior spackling chemical compound.
Oil-based primers are excellent choices for woods projects considering they penetrate deeply into wood fiber. This seals wood such as cedar and redwood that tin produce bleed stains when coated with water-based products. Primers are a must on bare wood and any previously painted surfaces that exhibit blisters, flaking or any sign of pigment erosion.
To conform for the motility of forest, information technology helps to use paint with born flexibility. Acrylic resins (paint glue) offer the greatest corporeality of flexibility. These paints resist getting brittle similar older oil-based paints, and they tin can withstand years of substrate movement.
Surface Selections
Different substrate materials require different prep methods. Jobs that involve new concrete block, for case, shouldn't be painted until the mortar has cured for at to the lowest degree thirty days. For a smooth surface on concrete cake, products such as Sherwin-Williams' PrepRite Block Filler allow the topcoat to be more compatible and unbroken.
Other projects may involve poured concrete, stucco, masonry and cement-limerick lath. When newly installed, these surfaces must cure for at least 30 days and take no moisture problems before painting. Use an exterior acrylic masonry primer for these materials.
Concrete Floors
Before painting concrete floors, perform a moisture test. Tape a two-pes square of plastic to the floor and expect almost 48 hours. If the physical discolors or there are whatever visible signs of moisture trapped in the plastic, the floor shouldn't be painted. Otherwise, use a degreaser to thoroughly clean the surface. Then roughen the surface with a wire brush and acrid-based solution to help ensure a potent bond with the paint. A mixture that works well is 1 part hydrochloric acid to ane part water. Later applying, rinse the flooring with water and allow it dry for 2 to three days. Allow new concrete to cure for at least 30 days prior to painting.
Metals
When information technology comes to prepping metals for pigment, start by cleaning away whatever corrosion with a wire brush and sandpaper. Metal should be primed the aforementioned 24-hour interval it is cleaned. Oil- or alkyd-based metal primers that contain high quantities of rust-inhibitive pigments tend to get the best results when priming rusty steel.
Unfinished galvanized metal or aluminum should be wiped with a degreasing cleaner, rinsed and stale. At that place are both water-based and oil-based paints that work well for metals, but be sure to utilise paints that are uniform with your primer. Most manufacturers bespeak what type of primer should be used for a particular stop coat, and vice-versa.
At that place are also special paints bachelor for painting the metal of central heating pipes and radiators. These special paints are designed to stand up up to the loftier temperatures of these areas.
Aluminum and Vinyl Siding
For aluminum siding, first clean the siding with detergent, rinse thoroughly and let dry for several days. Remove any mildew, chalk or other droppings; paint will not stick to a chalky surface. Supervene upon whatsoever loose caulk. To prime number aluminum siding, leading manufacturers recommend using a thinned metal priming paint. Endeavour a mixture of one pint of paint thinner to one gallon of loftier-quality oil-based primer. And consider having the primer tinted to half the strength of the color of your cease pigment.
For vinyl siding, follow the same cleaning procedure as aluminum siding. An oxygen bleach solution does a skillful chore of removing mildew from vinyl. Oxygen bleach won't damage the vinyl or the plants in your m. Priming the vinyl siding is non necessary, but remove any rust from metallic areas and coat those with a good rust-inhibitive primer.
Vinyl siding will warp from heat buildup. For this reason, very night colors are not recommended. As a general rule, don't paint vinyl siding whatever darker than the colour of the original siding. And make sure your exterior paint is formulated to stick to vinyl siding despite the vinyl's tendency to greatly aggrandize and contract. Recent advances in paint limerick offer new pigment options that piece of work great on vinyl.
Plastic
When the object at hand is plastic, to which paint doesn't easily attach, new products like Rust-Oleum's Specialty Plastic Primer are formulated specifically for paint adhesion and durability on plastic. This gives home decorators the ability to personalize their plastic items with any of hundreds of pigment colors, sheens or specialty finishes. Some other company, Krylon, offers a new line of plastic cease paint called Fusion that is designed to bond to plastic without sanding or priming. Bachelor in 16 color choices, Krylon'southward Fusion plastic paint is designed to dry in xv minutes. Both the Rust-Oleum and Krylon products are available in spray-nozzle cans for piece of cake application to irregular surfaces such as patio furniture.
Clean the surface of any plastic detail before spraying on the primer (or finish paint) to provide a tight, adhesive bond between the plastic and topcoat. These advances in paint applied science make available a vast array of options to transform drab plastic planters, lawn chairs or other items into eye-communicable accessories.

Plastics? No problem. New products such as Krylon's Fusion line of spray paints make information technology easy to customize backyard furniture, planetrs and other plastic items.
When to Paint
Weather conditions can have a great impact on how well pigment holds upwardly. The worst atmospheric condition are extreme rut or cold. Paint needs to chemically bond to the surface it is covering. This bonding can only happen if the solvent (water or mineral spirits) in the paint evaporates at a dull or medium pace. Water-based paints used on a vivid, hot or windy mean solar day tin can result in the h2o evaporating also quickly from the paint. Plan your painting for cooler temperatures and try to paint areas later direct sunlight has left them for the mean solar day.
The play a joke on to prepping a paint job is to plan ahead, to be patient and to consummate these crucial procedures. Don't jump ahead. Cede instant gratification for the sake of long-term satisfaction, and your topcoat will stick around for many moons to come up.
Sources
3M, 3M.com
Krylon, krylon.com
Masterchem Industries, KILZ.com
Rust-Oleum, rustoleum.com
Sherwin-Williams, sherwin-williams.com

How To Repair Outside Wooden Stairs Paint,
Source: https://extremehowto.com/prep-steps-for-outdoor-painting/
Posted by: brownpospits1945.blogspot.com
0 Response to "How To Repair Outside Wooden Stairs Paint"
Post a Comment